If your remote desktop screen is too small, too big, or doesn’t fit your monitor, you’re not alone. Issues like “rdp screen resolution too small” or “remote desktop resolution too large” are extremely common, especially when working with VPS or multiple monitors.
In this guide, you’ll learn how to change remote desktop resolution, resize the window properly, and fix display scaling issues in just a few steps.
Why Remote Desktop Resolution Looks Wrong
Before fixing it, it helps to understand why this happens:
- Your local screen resolution differs from the remote server
- RDP starts with a fixed resolution
- Display scaling (DPI) mismatch
- Windowed vs full-screen mode conflicts
- Saved .rdp settings overriding your changes
This is why you may see:
- remote desktop screen too small
- remote desktop screen resolution too big
- remote desktop not fitting screen
Step 1: Open Remote Desktop Connection
Press Windows key and search for Remote Desktop Connection.
Alternatively, open it directly:
mstsc
Step 2: Open RDP Display Settings
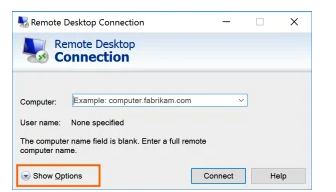
Click Show Options in the bottom-left corner.
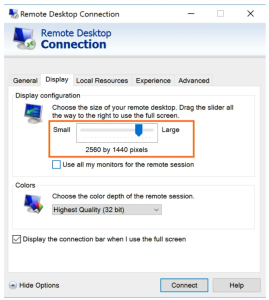
Then go to the Display tab.
Step 3: Change Remote Desktop Screen Resolution
Under Display configuration, use the slider:
- Move left → lower resolution (fixes remote desktop resolution too big)
- Move right → higher resolution (fixes rdp resolution too small)
This directly controls your remote desktop display resolution.
Tip:
- Use Full Screen for best experience
- Match your local monitor resolution for optimal clarity
Step 4: Connect Using New Resolution
Click Connect to start your session.
Your new resolution will apply immediately.
Step 5: Verify Resolution Inside RDP
Once connected:
- Right-click desktop
- Open Display settings
- Check Display resolution
This ensures your remote desktop screen resolution matches your settings.
Step 6: Save RDP Settings (Important)
By default, changes are NOT saved.
To make them permanent:
- Go to General tab
- Click Save As
- Save your .rdp file
This prevents repeating the issue:
- remote desktop resolution resets
- rdp screen size changes every login
How to Resize Remote Desktop Window (Quick Fix)
If you don’t want to reconnect:
- Drag the RDP window edges (window mode)
- Or toggle:Ctrl + Alt + Break→ switches between windowed and full screen
This helps when:
- you need to resize remote desktop to fit screen
- quick fix for remote desktop resize issues
Fix: Remote Desktop Screen Too Small
If everything looks tiny:
- Lower resolution in RDP settings
- Inside RDP:
- Go to Display settings
- Increase Scale (125% / 150%)
This solves:
- remote desktop screen too small
- rdp display too small
Fix: Remote Desktop Resolution Too Big
If elements are oversized or cut off:
- Increase resolution via slider
- Use full screen mode
- Ensure local scaling isn’t too high
Advanced Tip: Edit RDP File Manually
You can directly control resolution in your .rdp file:
desktopwidth:i:1920
desktopheight:i:1080
This is useful for:
- automation
- VPS setups
- consistent environments
Multi-Monitor Setup (Optional)
If you use multiple screens:
- Go to Display tab
- Enable:
✔ Use all my monitors
This improves:
- workspace
- trading setups (especially Forex VPS users)
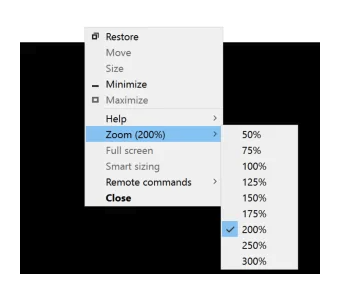
Bonus: Use Zoom Feature in RDP
After connecting:
- Right-click the top bar
- Use Zoom
Helpful when:
- resolution is correct but readability is off
Common Issues & Fixes
Problem: Remote desktop not full screen
→ Press Ctrl + Alt + Break
Problem: Black bars on screen
→ Match resolution exactly to monitor
Problem: Blurry display
→ Disable scaling or match DPI settings
Final Thoughts
Adjusting remote desktop screen resolution is the fastest way to fix usability issues in RDP sessions. Whether your remote desktop screen is too large or too small, using the built-in display settings or resizing options will solve it in seconds.